

Same as many other countries, Japan has a inspection to which cars are regularly subject to. For a new vehicle, the first vehicle inspection is 3 years after the first registration. From there onwards, every two years an inspection is necessary. Japan is the country of convenience so the majority of people are giving their car to garage and let them take care of the “Shaken”, as it is called in Japanese. But did you know you can do it by yourself?!
As mentioned for the car inspection there are multiple options to do it. Most common is to let the dealer where you bought the car do it or to give it to a Shaken specialist. They normally do a pre-test so it is known on forehand what the costs will be. Shaken specialists are usually cheaper than a regular car dealer. Doing it by yourself is much cheaper than the 2 before mentioned options.
Based on my experience, there are some requirements though to do Shaken by yourself:
1. Have a half day or full day to spare
2. Have decent Japanese language skills
3. Have a pocket full of cash
Regarding point 1:
In case you are not familiar with the process, it takes some time to fill the documents and find the necessary windows to get your administrative work done. Of course the test itself also takes some time, 30 minutes to 1 hour depending on the amount of people doing it on the same day. Finaly there is a risk that your car fails on one or more points, which would mean it needs to be fixed. In case of a quick fix you might get it repaired close to Shaken center and you can get back in line to re-test on the part(s) that failed. Personally I would spare a full day and go in the morning.
Regarding point 2:
At least a level in which you can you communicate fluently with Japanese would be required from my experience. Also being able to read around 1000 Kanji is helpful for filling in the administrative work. There are examples for the paperwork but having a big knowledge of Kanji makes everything so much more easy and less time consuming. For the actual test it is also useful to know Japanese automotive terms like car parts, release or pressing pedal and going forward, etc.
Regarding point 3:
The Shaken timing is usually also the time that people pay automotive tax and mandatory insurance. All of these things need to be paid in cash so depending on the vehicle, it can go up to a big number quite easily. I had to pay around 45000 Yen in total for the road tax and mandatory insurance (2 year period). In case you fail the Shaken, you might need to get something fixed that day and of course this adds up as well. I would always have 2-30000 Yen additional in cash than what needs to be paid for the tax and insurance.
So you decided you would like to do the Shaken yourself, also called ユーザー車検 (user Shaken). Here are the steps that you need to follow.
Step 1 – Make an appointment:
In case the Shaken is taken and passed within 1 month before the expiring date, the expiry date is extended with 2 years. Once you have decided the date that you would like to do the Shaken, you need make an appointment. This should be done two weeks before the actual date via the following website:
https://www.yoyaku.naltec.go.jp/pc/reservationTop.do
Create an account. Then login. Click on 検査の予約.

Then select the Shaken center that you would like to use. (First black dot area)
And select 継続検査 (highlighted in red) for regular Shaken test for continuing to use your vehicle. (Second black dot area)
Finally on this page select the category of your vehicle. (Third black dot area)
And click on 次へ on the bottom of the page.

The following screen lets you select the desired date. As mentioned above, only the upcoming two weeks are shown. Select the date and you brought to a next screen. Fill in your personal details here and you can receive the confirmation.
Step 2 – Do a pre-check:
If you have the opportunity, check your vehicle before the Shaken test so you are sure that there are no hidden defects. It is likely that you need to go to a garage or pre-test center for a pre-check as there is special equipment used for emission testing, braking and headlamp testing during the actual Shaken test. In case you got the equipment and are skilled enough, you can do it yourself of course.
Step 3 – Check-in & administrative
The day for the Shaken has come. Upon arrival at your Shaken test center you should go to the reception or counter with the following sign.

Show them your reservation number. In return they will give you three documents to fill. Three filled examples are below, which are normally also present at the Shaken center.


When the documents are filled in, you need to get stamps for doing the shaken test, vehicle tax and compulsory insurance. (See step 4)
Step 4 – Getting the necessary stamps
Find the counters for paying the tax and mandatory liability insurance. Pay the tax (normally 2 year period) and you get stamps equal to the amount which need to be put on the pink form. At the same counter you also need to pay for the shaken test. The stamps you receive here are put on the third document written above (Shaken test results). Lastly you need to pay for the liability insurance which is most likely at a different counter again. After this is done, you receive a proof which you should keep in your car.
Now you can return to the original reception counter with your 3 forms, the current shaken document and the liability insurance proof. If all is good, the person will give you back your necessary documents. Also, the person at the counter will ask you if you did it before. If not, they will give you a special mark that you should put visible in your car so the testing personnel can see that you are a beginner. There are different lanes for different type of vehicles and tests, so you will also get assigned a lane from the person at the counter. Now you can go and do the actual shaken test.
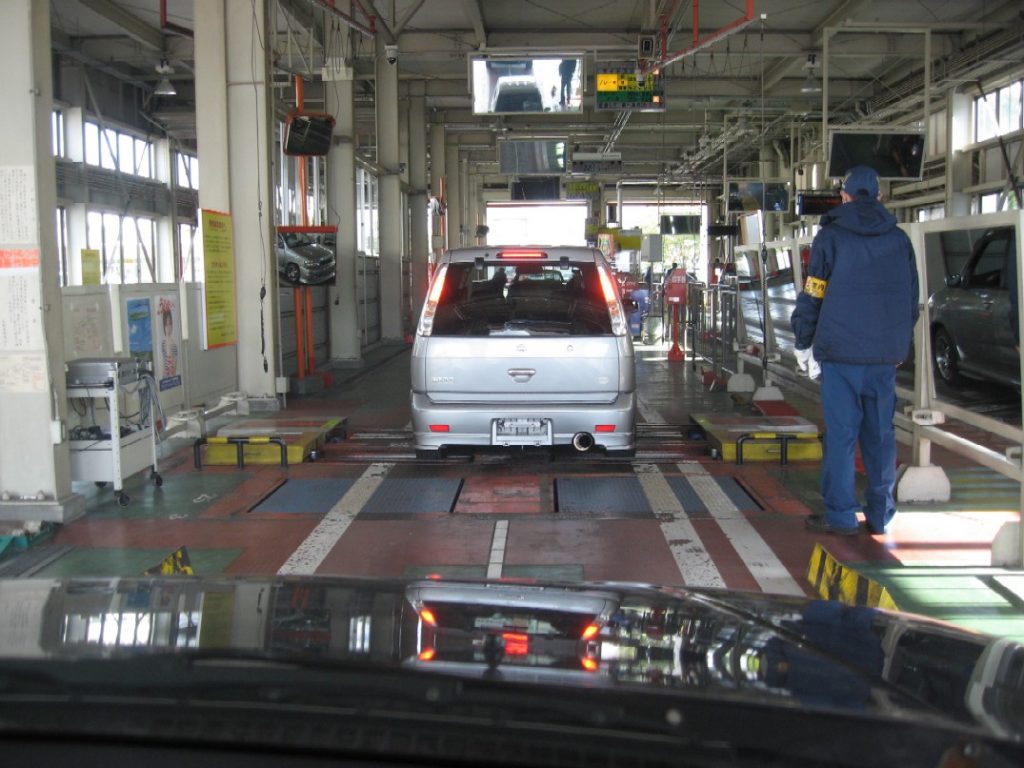
Step 5 – The actual Shaken test
Drive into the lane that was assigned to you. This is straight forward and clearly written on the road. Normally there are cars in front of you so just line up behind them. At a certain moment the testing personnel will come to your car. Follow their instructions. Basically this is where the testing starts. Keep in mind, the order of the tests can change depending on which testing center you go to.

You should operate all your lights. 2 times as one time for the front and one time for the rear. They will make an exterior inspection of your car. You should get out of your vehicle and open the lid to your engine compartment. They will inspect the engine compartment.
The next test is for measuring the ground clearance and exhaust sound. Followed by an emission test for which you should put a probe inside your muffler. A bit further ahead there is a rolling road in which you should speed up to 40 km/h in order to test your speedometer. Once you reach the required speed, flash with your high beams. It is also used to test your brakes.
Another test is for the lights. At this time a machine will come in front of the car and you should operate your headlights. The machine is checking whether your lights are adjusted properly. After the test your can take your test card and put them inside a machine which gives you the scoring for all of the tests done so far.
The last check is for the underbody which is done by testing personnel while you in your car turning your steering wheel and operating the brakes. After that the test is finished and you should go to the counter at the end. The person there will give you the final scoring and tells you whether you passed or not.

It can happen that you do not pass the first time. In case it is something small, go to the information desk and ask them where you can you get it fixed. In most cases there is a repair shop / adjustment center connected to the Shaken center. Get your small problem(s) fixed there (it costs money of course) and ask them to which line you should return. Then head back to the line, show the testing personnel which tests you failed and that you want to re-do those again and normally you should pass.
In case there is a bigger problem, it might not be able to get fixed on the day itself. Repair it or take your car to a repair shop and then make another appointment for the Shaken. I have not had this experience so I would advice to go to the reception again.
Step 6 – Finishing off
If you successfully passed the test, it is time to head back to the counters. Now head back to the original counter, return your three forms (examples shown above) including your ‘existing Shaken document’ to the person at the counter. They will process them and a few minutes later your new Shaken document is handed over to you including a sticker for your windshield and license plate. Put the stickers and you are done!
